
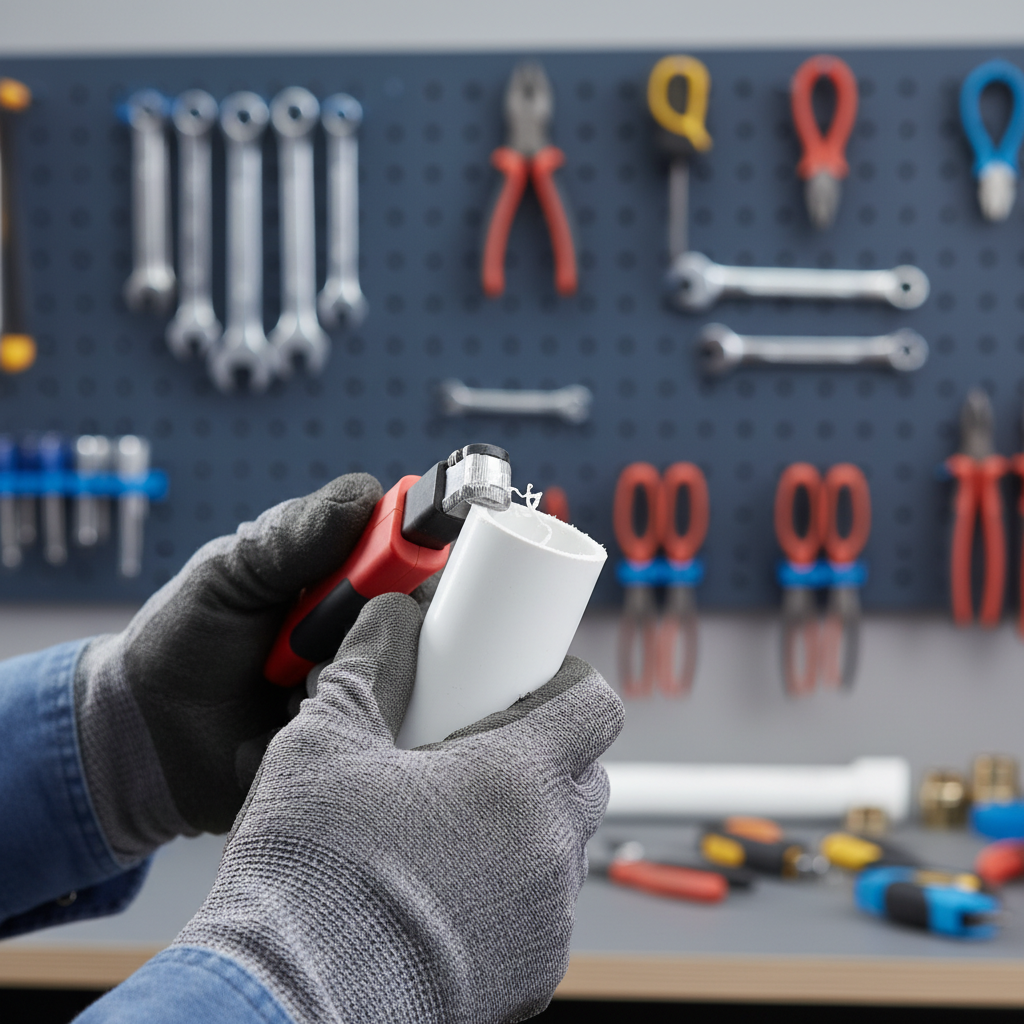
PVC pipe reamer deburring tool choices matter more than most people expect, because one rushed cut can leave burrs and a sharp inner lip that fights your fitting, steals glue coverage, and sometimes creates a slow leak weeks later.
If you have ever felt a coupling “hang up” halfway on, or watched purple primer and cement push into a ridge instead of wetting the whole socket, you have already met the problem this tool solves. Clean edges help the pipe seat fully and help solvent cement bond evenly, which is the boring part that prevents call-backs.
I will walk through what these tools actually do, when you need reaming versus deburring, what to look for when buying, and a practical routine that works for common U.S. plumbing and irrigation jobs.
What a PVC pipe reamer & deburring tool actually does
A reamer and a deburring tool often get lumped together, but they solve slightly different parts of the same headache: rough pipe ends after cutting.
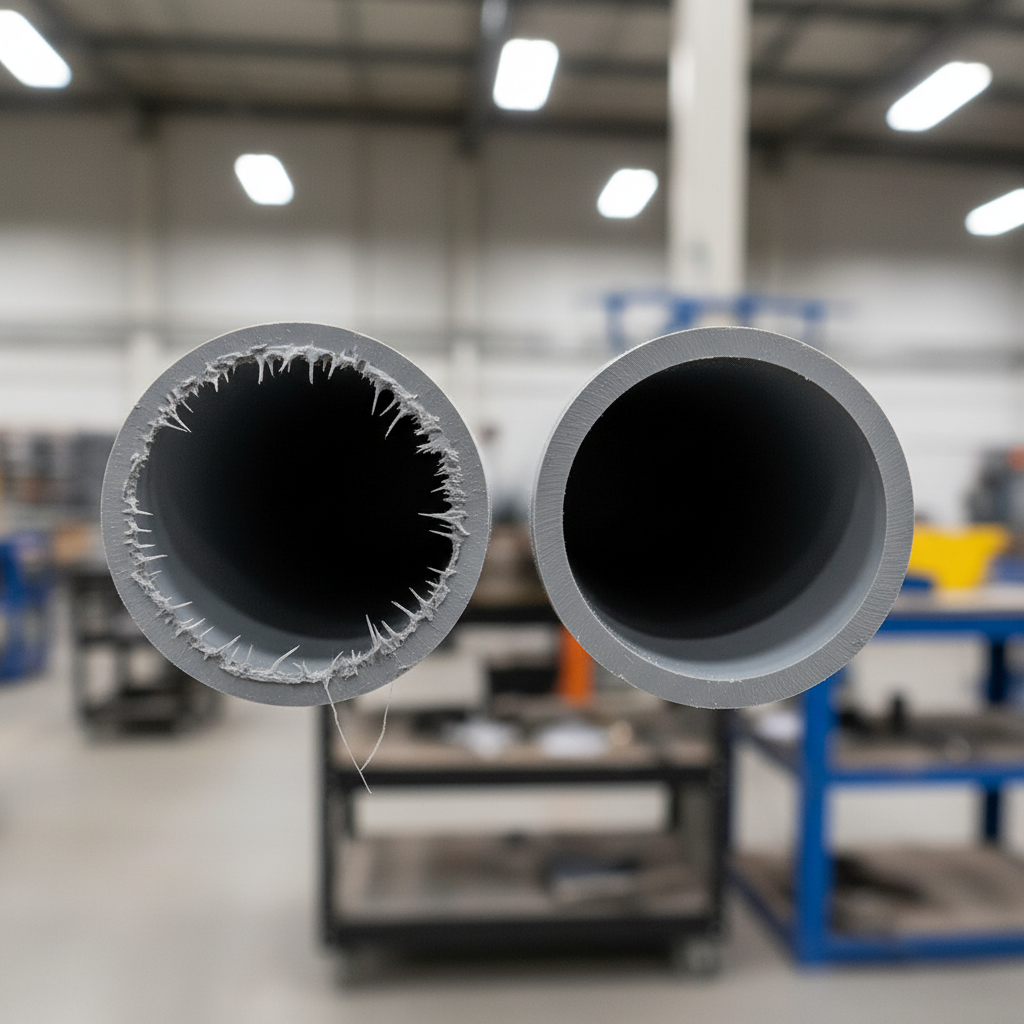
- Deburring removes the thin plastic “fuzz” and sharp edge on the inside and outside rim, so the pipe slides and doesn’t shave plastic into the joint.
- Reaming restores a clean, consistent inner diameter and adds a light internal chamfer, which helps the pipe enter a fitting without scraping off cement.
Many combo tools do both, usually with an internal blade for the inside edge and an external blade for the outside edge, and some add a deeper internal ream profile meant for Schedule 40/80 PVC sizes.
According to OSHA, hand and power tools must be used and maintained safely to avoid injuries, so treat cutting and edge prep as a real safety step, not just “cleanup.” Gloves and eye protection are not overkill when PVC curls start flying.
Why burrs and rough edges cause real problems (not just ugly pipe)
Most failures here are not dramatic, they are annoying. A joint might hold pressure today, then show a weep line later, or it may fail inspection because the pipe is not fully seated.
- Shaved cement coverage: a sharp edge can squeegee cement off as the pipe enters the socket, leaving dry spots.
- Incomplete insertion: burrs increase friction, and the pipe stops short even though it “feels” tight.
- Debris in the joint: little plastic ribbons can fold into the glue line, creating channels.
- O-ring damage: on gasketed or push-fit style PVC systems, a rough edge can nick the seal.
There is also the simple handling issue. A sharp PVC edge can slice skin fast, especially when you are rushing a repair in a cramped space.
Quick self-check: do you need reaming, deburring, or both?
Use this as a fast field check before you reach for cement. If you see any “maybe,” just prep the edge, it takes seconds and usually saves minutes later.
- Pipe won’t start straight into the fitting or needs excessive force to begin insertion.
- Visible inner lip from a ratcheting cutter, saw, or dull blade.
- Outer edge feels sharp when you drag a fingertip lightly across it.
- Plastic shavings collect on the pipe end after test-fitting.
- You’re working with gasketed fittings or repairs where you cannot afford to redo a joint.
Choosing a PVC pipe reamer deburring tool: what matters in the U.S. market
There are cheap tools that “kind of” scrape plastic, and there are tools that leave a smooth, repeatable chamfer without gouging. The difference shows up when you do more than a couple cuts.
Key buying criteria
- Size range: confirm it matches your common pipe, like 1/2 in to 2 in Schedule 40, or larger for drain work.
- Blade material: hardened steel lasts longer and cuts cleaner than soft stamped edges.
- Ergonomics: a wide grip matters when hands are wet or you are wearing gloves.
- Cut profile: you want a light chamfer, not a deep countersink that thins the wall.
- Debris clearing: some designs pack shavings, which makes the tool chatter and chew.
If you do occasional homeowner repairs, a simple hand deburr tool may be fine. If you do service work, a combo reamer that stays sharp pays for itself in fewer redo joints and less fitting wrestling.
How to use it: a practical step-by-step routine that avoids over-reaming
Good edge prep is consistent, not aggressive. You are not “opening up” the pipe, you are removing the problem edge and giving the pipe a lead-in.
Step-by-step
- Cut square: a crooked cut makes everything harder, even with a great tool.
- Deburr outside edge: 2–4 light turns, aim for “not sharp,” not rounded off.
- Ream inside edge: a few controlled turns until the inner lip disappears.
- Dry fit once: the pipe should start and seat smoothly without forcing.
- Wipe the end: remove dust and shavings so primer/cement contacts clean plastic.
According to ASTM International standards commonly referenced for plastic piping systems, workmanship steps like proper cutting and preparation help support reliable joints. Exact requirements can vary by product and local code expectations, so if you are working on a permitted job, follow the manufacturer instructions on the cement and fittings as well.
Common scenarios and the “right amount” of prep
Where people get stuck is not knowing how clean is clean enough. Here are realistic targets by situation.
Schedule 40 pressure lines (irrigation, pool, supply where allowed)
- Focus on a small, even chamfer and clean outer edge.
- Do not dig a funnel into the pipe, it can reduce wall thickness at the joint.
DWV (drain, waste, vent)
- Still deburr and chamfer, even though it is not “pressure.” Leaks and clogs start at bad workmanship.
- Extra care if cutting with a saw, because it tends to leave heavier burrs.
Gasketed PVC (push-on, some sewer/storm systems)
- Prioritize a smooth bevel so the gasket does not roll or nick.
- If the fitting manufacturer specifies a bevel angle/depth, follow that guidance.

Tool comparison table: what to pick for your workflow
This is a practical overview, not a brand ranking. The “best” tool is the one that matches your pipe sizes and how often you cut.
| Tool type | Best for | Pros | Watch-outs |
|---|---|---|---|
| Hand deburring tool (inside/outside) | Home repairs, occasional cuts | Cheap, fast, easy to carry | May not remove a heavy inner lip on thicker pipe |
| Combo PVC reamer + deburr | Service work, mixed tasks | One tool does most prep, consistent chamfer | Can over-ream if you push too hard |
| Drill-driven reamer | High volume cuts, shop work | Very fast, reduces hand fatigue | Easy to remove too much material, use low speed |
| Knife/sandpaper “shortcut” | Emergency only | Better than nothing | Inconsistent bevel, higher injury risk, leaves fuzz |
Mistakes that waste time (and how to avoid them)
- Over-reaming the ID: if the pipe wall looks thinned at the edge, back off. You want a small lead-in, not a countersink.
- Skipping cleanup after reaming: shavings left on the pipe end can contaminate the cement layer.
- Assuming primer/cement “fixes” bad prep: solvent cement works best when surfaces mate evenly.
- Using dull cutters: a ragged cut creates more work for the reamer, and results stay inconsistent.
- High-speed drilling: a drill can melt PVC, leaving a smeared edge that looks smooth but bonds poorly in many cases.
Key takeaway: a few light turns with a PVC pipe reamer deburring tool usually beats aggressive cutting, because you control the edge shape instead of chewing it.
When to slow down and get professional help
If this is a critical line, it is smart to be conservative. Call a licensed plumber or qualified contractor when you are unsure about code, pipe type, or joint method, especially on potable water, gas-adjacent work, or systems that could cause property damage if they leak.
Also consider help if fittings keep cracking, joints repeatedly fail, or you suspect the wrong cement/primer for the material. According to IAPMO, plumbing products and practices are commonly guided by codes and standards, and local requirements can change what is acceptable for a given installation.
Conclusion: cleaner pipe ends mean fewer surprises
A PVC pipe reamer deburring tool is a small purchase that often prevents the frustrating stuff, pipe that won’t seat, cement that gets scraped off, joints that need a redo. Keep your prep consistent, avoid over-reaming, and wipe the pipe end before priming and cementing.
If you want one next step, do this on your next project: cut square, deburr inside and outside, dry-fit once, then glue. It feels slower for about five minutes, and then the whole job speeds up.
FAQ
Do I really need to deburr PVC pipe before gluing?
In many cases, yes. A sharp inner lip can scrape cement and keep the pipe from seating fully, so deburring is cheap insurance even on small repairs.
Is a reamer the same as a chamfer tool for PVC?
They overlap. Many reamers create a chamfer as they clean the inside edge, while some chamfer tools focus on the outside edge. Combo tools cover both, which is why they are popular.
Can I use sandpaper instead of a PVC pipe reamer deburring tool?
Sandpaper can work in a pinch, but it is slower and tends to round the edge unevenly. If you do more than occasional work, a purpose-built tool gives a more consistent bevel.
How much chamfer is too much on Schedule 40 PVC?
If you can see a wide funnel shape or the wall looks visibly thinned at the edge, that is usually too aggressive. You want a small, smooth lead-in that removes the sharp corner.
Can I use a drill to speed up reaming PVC?
Often you can, but low speed and light pressure matter. High speed may melt PVC and leave a smeared surface, so test your process on a scrap piece first.
Why does my pipe still feel tight after deburring?
Common causes include an out-of-square cut, a slightly out-of-round pipe end, or debris inside the fitting. Ream the inside lip, check the cut, and try a different fitting if tolerances feel off.
What about CPVC, ABS, or PEX, can I use the same tool?
Sometimes, but it depends on the tool design and material. CPVC can be more brittle, ABS behaves differently, and PEX prep is its own category. If the tool label does not list the material, treat it as “maybe” and follow manufacturer guidance.
If you are doing repeated repairs or installations and want fewer re-dos, it may be worth standardizing on one solid reamer/deburring tool that matches your most common pipe sizes, plus a simple routine your whole crew follows, consistency beats hero fixes.