
Threaded insert for wood is one of the simplest ways to stop screws from stripping out, especially in furniture that gets assembled, moved, and tightened more than once. If you build cabinets, tables, bed frames, or shop fixtures, inserts can turn “good enough” fasteners into joints you can trust.
The catch is that inserts are easy to get wrong, the wrong type spins, splits the wood, or pulls out, and then you’re worse off than a plain screw. The goal is not “use inserts everywhere”, it’s knowing when they actually add strength, what style matches your wood and load, and how to install them without drama.
Below is a practical guide that separates common use cases, shows a quick decision checklist, and walks through installation steps that hold up in real furniture. I’ll also call out the mistakes that usually cause failures, because most “inserts don’t work” stories trace back to hole size, grain direction, or over-torquing.
What threaded inserts actually solve in wood furniture
In furniture, most fastener problems come from wood fibers compressing and tearing over time. A screw bites into fibers, then repeated tightening, side loads, or seasonal movement gradually enlarges the hole. An insert replaces those vulnerable fibers with metal threads, so the bolt engages metal-to-metal instead of chewing up wood.
- Repeatable assembly: knock-down furniture, bed rails, removable legs, jigs, trade show displays.
- Higher clamp force: you can snug a bolt more consistently than a wood screw without stripping.
- Cleaner repairs: when a screw hole is blown out, a threaded insert for wood can “reset” the connection.
- Better alignment: bolts and machine threads reduce the wandering you get when re-driving screws.
According to the U.S. Forest Service, wood is anisotropic, meaning its strength varies by grain direction and moisture condition, which is a polite way of saying fasteners behave differently depending on where and how you load them. Inserts help, but they still depend on sound wood around them.
Types of inserts for wood (and where each one makes sense)
Most furniture builders in the U.S. run into four common styles. Each can work, but they’re not interchangeable in practice.
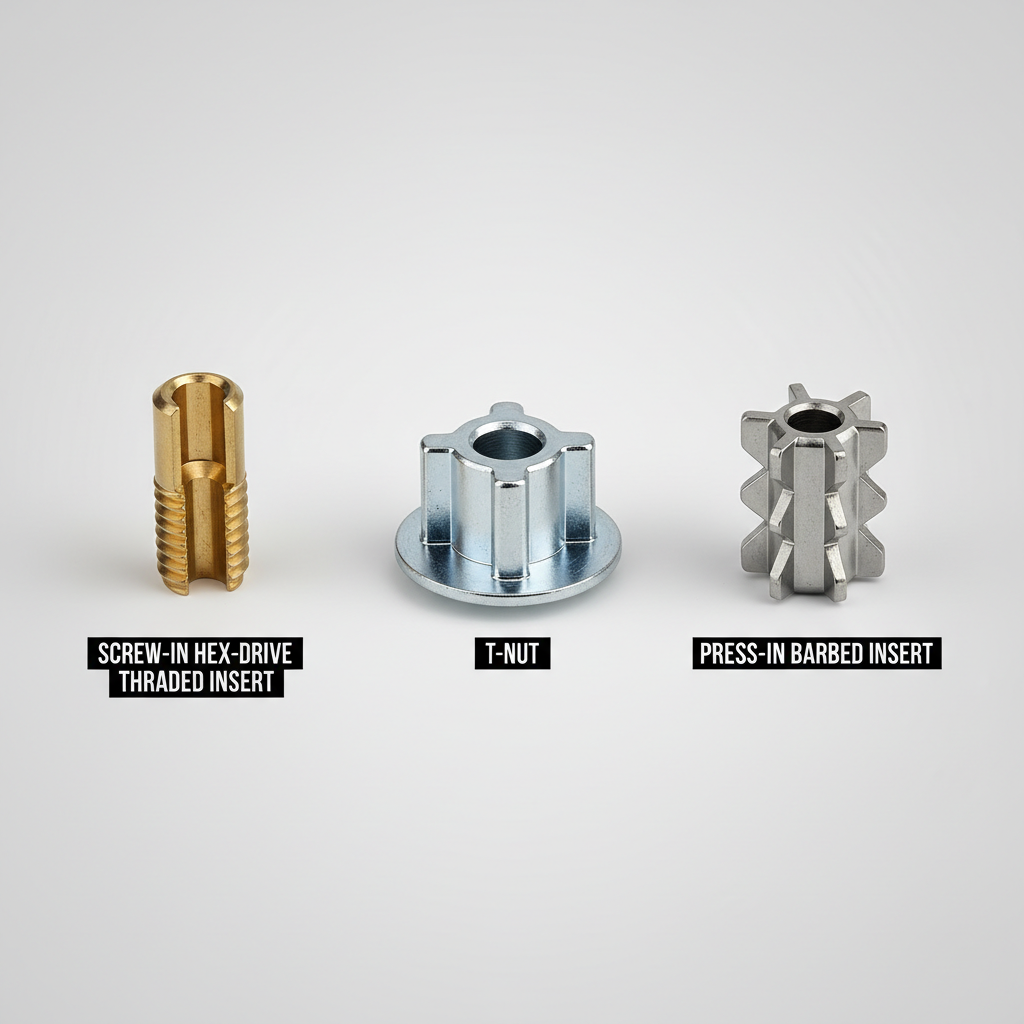
Hex-drive screw-in inserts
These are the classic external threads with an internal machine thread, driven by a hex key or driver bit. They’re popular because they’re easy to source and quick to install.
- Great for: hardwoods, plywood cores, furniture parts with decent thickness
- Watch-outs: can split narrow parts, can “jack” grain if you overdrive
Press-in / barbed inserts
Often used in softer materials or factory settings with controlled pressing. In solid wood furniture they’re hit-or-miss unless the fit is perfect and loads are modest.
- Great for: MDF/particleboard in some cases, light-duty panels
- Watch-outs: pull-out risk under tension, especially in solid wood end grain
E-Z style knife-thread inserts (coarse external threads)
These cut more aggressively into wood and can hold well when you match the pilot hole carefully.
- Great for: hardwoods where you want high resistance to pull-out
- Watch-outs: can split parts if edge distance is tight
T-nuts (from the back side)
T-nuts aren’t “inserts” in the screw-in sense, but they solve the same machine-thread problem. They’re excellent when you can access the back and want strong resistance to pull-through.
- Great for: workbenches, jigs, hidden backsides, high clamp loads
- Watch-outs: can loosen if prongs don’t bite well, often need anti-spin strategies
Quick self-check: do you actually need an insert here?
A threaded insert for wood is most worth it when the joint sees repeat tightening or when failure would be expensive to fix. If it’s a one-time assembly inside a cabinet that never gets touched again, a good screw and proper pilot hole might be the smarter move.
- You should strongly consider inserts if: you disassemble the joint, the part carries weight, or a stripped hole would ruin the piece.
- Use caution if: the part is thin, close to an edge, or made of very soft wood with short grain.
- Inserts are often unnecessary if: the fastener is only in shear with large bearing area and won’t be retightened.
Also be honest about the load direction. Many insert failures happen in tension (pulling out), not in shear (sliding), so a leg that gets yanked sideways during moving day is a different animal than a shelf cleat.
Choosing the right insert: sizing, wood species, and load
Shopping by “bolt size” alone is how people end up with spinning inserts. You want enough outside diameter and embedment depth so the surrounding wood can carry the load without crushing.
A practical selection table
| Project situation | Wood/material | Insert style that usually works | Why |
|---|---|---|---|
| Removable legs on a table | Hardwood apron or thick plywood | Hex-drive screw-in insert | Good pull-out resistance, easy service |
| Bed rail brackets, frequent assembly | Hardwood or dense softwood | Knife-thread insert or T-nut (if backside access) | Handles higher clamp force, resists loosening |
| MDF panels for light fixtures/jigs | MDF/particleboard | Press-in insert or specialty inserts for composites | Designed for crumbly fibers, spreads load |
| Thin stock near edges | Solid wood, narrow parts | T-nut or redesign (move fastener, add block) | Reduces splitting risk from screw-in styles |
Key points that matter more than brand
- Embedment depth: deeper generally holds better, until you’re too close to the far face.
- Outside diameter: more “meat” in the wood, less chance of pull-out, but higher splitting risk.
- Material: brass is easy to drive but can deform, steel/zinc often tolerates higher torque.
- Thread form: coarse external threads tend to grip wood better than fine external threads.
If your design puts the insert into end grain, pause. End grain can work in some builds, but pull-out strength tends to be less forgiving, and you may need longer inserts, epoxy, or a different joint strategy.
Installation that holds: step-by-step (no guesswork)
Most insert installs fail because the pilot hole is off by a small amount. Too small and you split the wood or strip the insert drive, too large and it spins. When the packaging includes a drill size chart, treat it as a starting point, not law.
Tools you’ll actually use
- Drill or drill press, sharp bit (brad point helps in solid wood)
- Depth stop or tape flag
- Hex key/driver, or an insert installation tool
- Wax or bar soap for lubrication (optional but helpful)
Step-by-step
- Mark and square up: the hole needs to be perpendicular, especially for furniture legs and hardware alignment.
- Drill the pilot hole: sneak up on sizing if you’re unsure, test on scrap from the same board.
- Chamfer lightly: a tiny bevel reduces surface tear-out and helps the insert start straight.
- Lubricate: a touch of wax reduces friction, especially in hard maple or oak.
- Drive slowly: keep it straight, stop when flush or slightly below flush, don’t “muscle” the last turn.
- Test with the actual bolt: thread in by hand first, then tighten to working snugness.
If you’re using a power driver, keep torque low. Power makes it easy to overdrive, and overdriving is a common reason a threaded insert for wood chews out the hole and loses grip.

Common failure modes (and how to avoid them)
When people say inserts “don’t work,” it usually means one of these happened. The good news is most are preventable with small changes.
- Insert spins in the hole: pilot hole too large, wood too soft, or the joint sees repeated loosening. Fix by upsizing OD, switching insert type, or using a controlled adhesive strategy.
- Wood splits: pilot hole too small, too close to an edge, or driving too aggressively. Fix by increasing pilot size slightly, adding edge distance, or choosing a T-nut from the backside.
- Insert pulls out: tension load exceeds what surrounding fibers can hold. Fix by deeper embedment, larger OD, adding a hardwood block, or redesigning the load path.
- Threads feel gritty or bind: insert went in crooked or deformed during install. Fix by installing square, using steel inserts, and avoiding over-torque.
A quick reality check: if the surrounding wood is already crushed, punky, or delaminating, a threaded insert for wood won’t magically restore structure. You may need to cut back to sound material and patch the area.
Practical “best use” scenarios in furniture (with mini playbooks)
Here are a few common furniture situations and what tends to work without overengineering.
Removable table legs
- Use screw-in inserts in the apron or in a glued-in hardwood leg block
- Choose a bolt length that gives full thread engagement without bottoming out
- Add a washer to spread load and reduce finish damage
Stripped hinge or bracket holes
- If the hole is small, a dowel-and-redrill repair may be cleaner than inserts
- If you need machine threads (hardware upgrade), use an insert with enough OD to bite into fresh wood
- Test alignment before final tightening, inserts lock you into the new location
Knock-down bed frames
- Prefer deeper inserts or T-nuts where you can hide the backside
- Use threadlocker cautiously, some types can damage finishes and may complicate future service
- Recheck torque after a few days of use, wood fibers can settle
When to use adhesive (and when not to)
Some makers add epoxy or CA glue to “lock” inserts. Sometimes that helps, sometimes it creates new problems, like permanent misalignment or glue-starved bonds because the insert displaces adhesive.
- Consider adhesive when the wood is borderline soft, the insert has a history of spinning, or the joint won’t need removal.
- Avoid adhesive when you may need to replace the insert, when alignment is hard to guarantee, or when the insert is already a tight mechanical fit.
According to the Federal Trade Commission (FTC), product labels and safety instructions matter, so follow the adhesive manufacturer’s guidance on ventilation and skin contact. If you’re sensitive to fumes, wearing appropriate PPE and improving airflow is a reasonable precaution, and in tighter shop environments you may want to consult a safety professional.
Key takeaways before you start drilling
- Match insert type to load, tension loads punish weak choices.
- Pilot hole size is the job, not an afterthought, test on scrap from the same wood.
- Install square and stop early, overdriving causes more failures than underdriving.
- Design beats hardware, adding thickness or moving fasteners can outperform any insert.
If you want one habit that pays off, it’s this: keep a little offcut from each project and do a two-minute insert test before committing. That tiny step prevents most of the frustrating “why did it spin” moments.
Conclusion: a stronger joint, when you use inserts with intent
A threaded insert for wood earns its keep when you need repeatable assembly, higher clamp force, or a repair that won’t fail again next season. Pick a style that suits your wood and load direction, drill a controlled pilot hole, and drive the insert slowly, those three moves cover most real-world furniture builds.
If you’re planning a new piece, choose one connection to upgrade first, like removable legs or a bed rail joint, then scale the approach once you like how it behaves in use. Small, deliberate wins beat hardware scattershot every time.
FAQ
What is the best threaded insert for wood furniture legs?
For most hardwood aprons or leg blocks, a hex-drive screw-in insert is a solid choice because it’s serviceable and holds well when installed straight. If the wood is thin or you can reach the backside, a T-nut can be more forgiving against pull-out.
Can I use threaded inserts in plywood?
Yes, often with good results, especially in higher-quality plywood with thicker veneers. The main trick is avoiding voids and drilling cleanly, testing on scrap helps because plywood cores vary a lot by brand and grade.
Do threaded inserts work in end grain?
They can, but end grain usually gives less reliable pull-out resistance than side grain. If the joint sees tension, many builders switch to a different joint layout, add a hardwood block, or choose a deeper insert rather than hoping end grain will hold.
Why does my insert keep spinning when I tighten the bolt?
Most cases trace back to a pilot hole that’s slightly oversized or wood fibers that are too soft for that insert’s outside threads. Upsizing the insert OD, switching to a more aggressive external thread, or adding a mechanical lock strategy typically works better than cranking harder.
Should I glue in a threaded insert for wood?
Sometimes, but it depends on whether you need future service. Adhesive can help in softer woods or worn holes, but it also makes replacement harder and can lock in a crooked insert, so it’s best used intentionally, not automatically.
What bolt should I use with a wood insert?
Use a machine screw/bolt that matches the internal thread (commonly 1/4-20, 10-24, M6). If you’re unsure, bring the insert to the hardware aisle and test fit by hand, cross-threading is easy to start and annoying to fix.
How close to an edge can I install an insert?
There isn’t one universal number because wood species, insert OD, and thickness change the risk, but if you’re “too close” you’ll feel it during driving as the wood starts to wedge and split. When edge distance is tight, consider moving the fastener, adding a block, or using a backside solution like a T-nut.