
The best paint sprayer for home interior work is the one that matches your room size, paint type, and patience for masking, because indoors, overspray and cleanup punish the wrong choice fast.
If you’ve ever tried rolling a ceiling, repainting cabinet doors, or blending a patched wall, you already know the tradeoff: rollers feel safer but can look textured, brushes cut in well but take forever, and a sprayer can look showroom-smooth—until it fogs your whole hallway.
This guide keeps it practical for U.S. homes in 2026: which sprayer styles make sense indoors, what features matter more than marketing labels, and how to get a clean finish without turning your project into a week-long containment job.
What “Best” Means for Interior Spraying (Not Just Power)
For interiors, “best” usually means control more than raw speed. You want a sprayer that lays paint evenly, doesn’t spit, and can dial the fan pattern down for trim and doors.
- Low overspray tendency: Better pattern control and the right tip size matter more than max PSI.
- Finish quality: Cabinets and doors punish orange peel and dry spray.
- Reasonable setup/cleanup: If cleanup takes 45 minutes, you’ll avoid using it for small fixes.
- Compatibility with interior coatings: Most wall paints are thicker; some sprayers need thinning or larger tips.
- Indoor ergonomics: Weight, hose drag, and noise are real inside a house.
One more reality check: even the best paint sprayer for home interior projects can’t replace good prep. Sprayers make painting faster; they don’t make masking optional.
Paint Sprayer Types: Which One Fits Most Homes in 2026?
You’ll typically run into three categories. They all work; they just fail differently indoors.
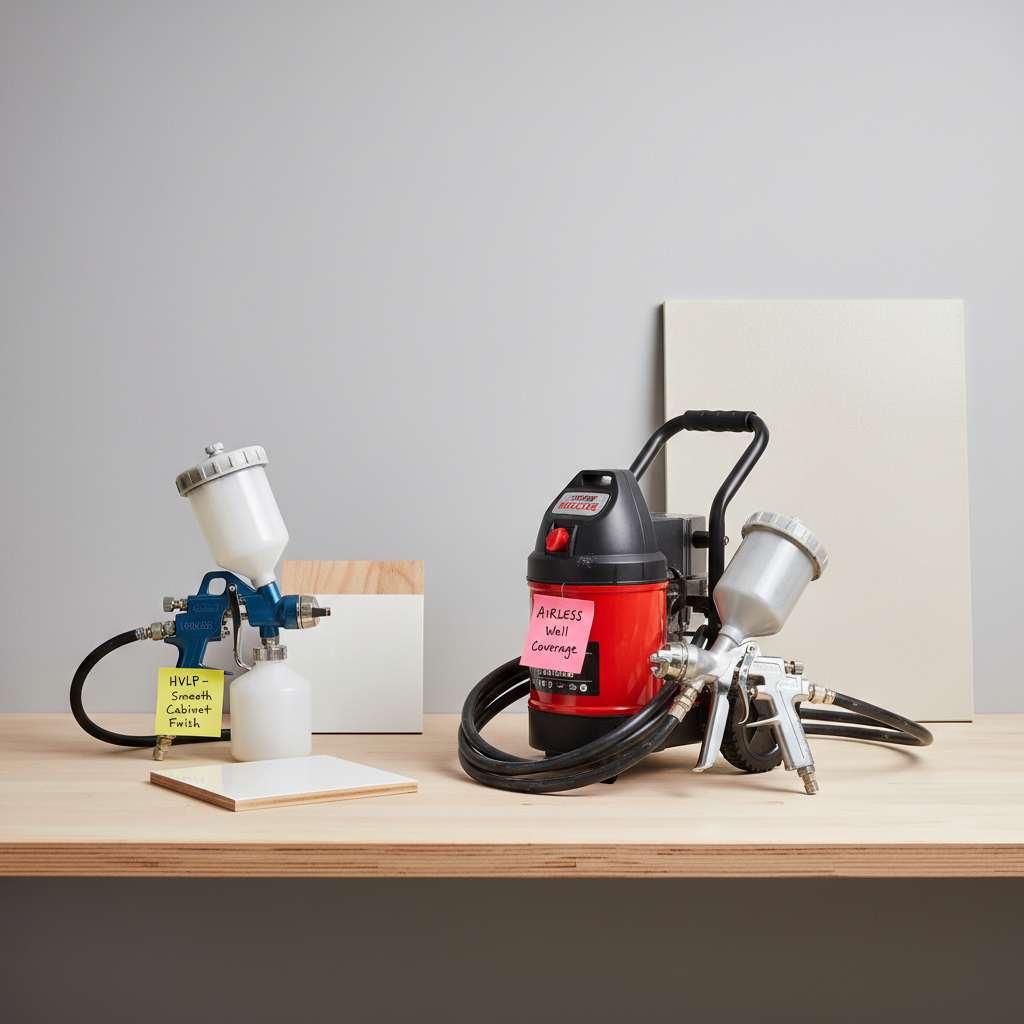
HVLP (High Volume Low Pressure)
HVLP is often the friendliest indoors when you care about finish and control. It’s popular for cabinets, trim, furniture, and doors. Many models push lower pressure at higher air volume, which can reduce bounce-back compared with blasting paint at high pressure.
- Best for: cabinets, built-ins, doors, detailed work
- Watch-outs: may struggle with thick wall paint unless you thin or use the right needle/nozzle set
Airless (High Pressure)
Airless sprayers excel at covering big areas fast: walls, ceilings, long hallways. Indoors, the downside is overspray and how quickly mistakes get big. With good tips and lower pressure settings, airless can still be the best paint sprayer for home interior walls if you’re doing multiple rooms.
- Best for: walls, ceilings, large rooms, whole-home refreshes
- Watch-outs: overspray, learning curve, and more aggressive masking
Compressed-Air / Pneumatic (less common for DIY)
These can deliver great finishes, but they require a capable air compressor and some tuning. Many homeowners skip this route unless they already own the compressor and enjoy dialing in equipment.
- Best for: experienced users, shop setups, frequent projects
- Watch-outs: compressor requirements, noise, more variables to adjust
Quick Recommendation Table (Choose by Project, Not Hype)
If you want a fast shortcut, decide by what you’re spraying most often. A lot of frustration comes from using a cabinet-friendly sprayer on big walls, or a wall monster on delicate trim.
| Project | Most practical sprayer type | What to prioritize | Common mistake |
|---|---|---|---|
| 1–2 rooms (walls) | Airless (adjustable pressure) | Smaller tips, pressure control, easy cleanup | Running pressure too high indoors |
| Ceilings | Airless + extension pole | Stable fan pattern, manageable weight | Skipping a respirator and eye protection |
| Kitchen cabinets | HVLP (turbine or conversion) | Fine atomization, consistent flow, good cup system | Overloading coats and causing runs |
| Trim + doors | HVLP or small airless setup | Fan control, easy pattern adjustment | Not testing on cardboard first |
| Touch-ups / small furniture | HVLP handheld | Fast setup, easy cleaning, light weight | Using thick paint without filtering |
How to Tell If You Actually Need a Sprayer Indoors
This is the part people skip, then regret. Use this quick self-check before you buy or rent.
- You should consider spraying if you have multiple doors, lots of trim, textured ceilings, or you care about a smooth cabinet finish.
- You may want to roll/brush instead if it’s one accent wall, a small bedroom, or you can’t realistically clear and mask the space.
- Spraying makes sense if you can dedicate a block of time, because setup plus cleanup often beats short sessions.
- Spraying is risky if your home has lots of open shelves, porous fabrics nearby, or people moving through the space all day.
In other words, the best paint sprayer for home interior work still needs the right environment, not just the right machine.
Key Features That Matter More Than Brand Names
Specs can get noisy fast. These are the features that tend to change your day-to-day experience indoors.
- Pressure control (especially for airless): Lets you back off pressure to reduce bounce-back and overspray.
- Tip availability and sizing: Interior walls, primers, and cabinet enamel often want different tips; easy access to tips saves projects.
- Fan pattern adjustment: Wide fan for walls, narrow for trim, round for spindles and edges.
- Filtration: Built-in filters cut clogs and spitting, a big deal with thicker interior paints.
- Cleanup design: Tool-free disassembly, flush connectors, and a cup you can actually rinse clean.
- Weight and hose management: Indoors, fatigue shows up quickly, especially on ceilings or stairwells.
If you’re choosing between two models, pick the one that makes pressure adjustment, tip swaps, and cleaning simpler. That’s usually what determines whether it gets used again.
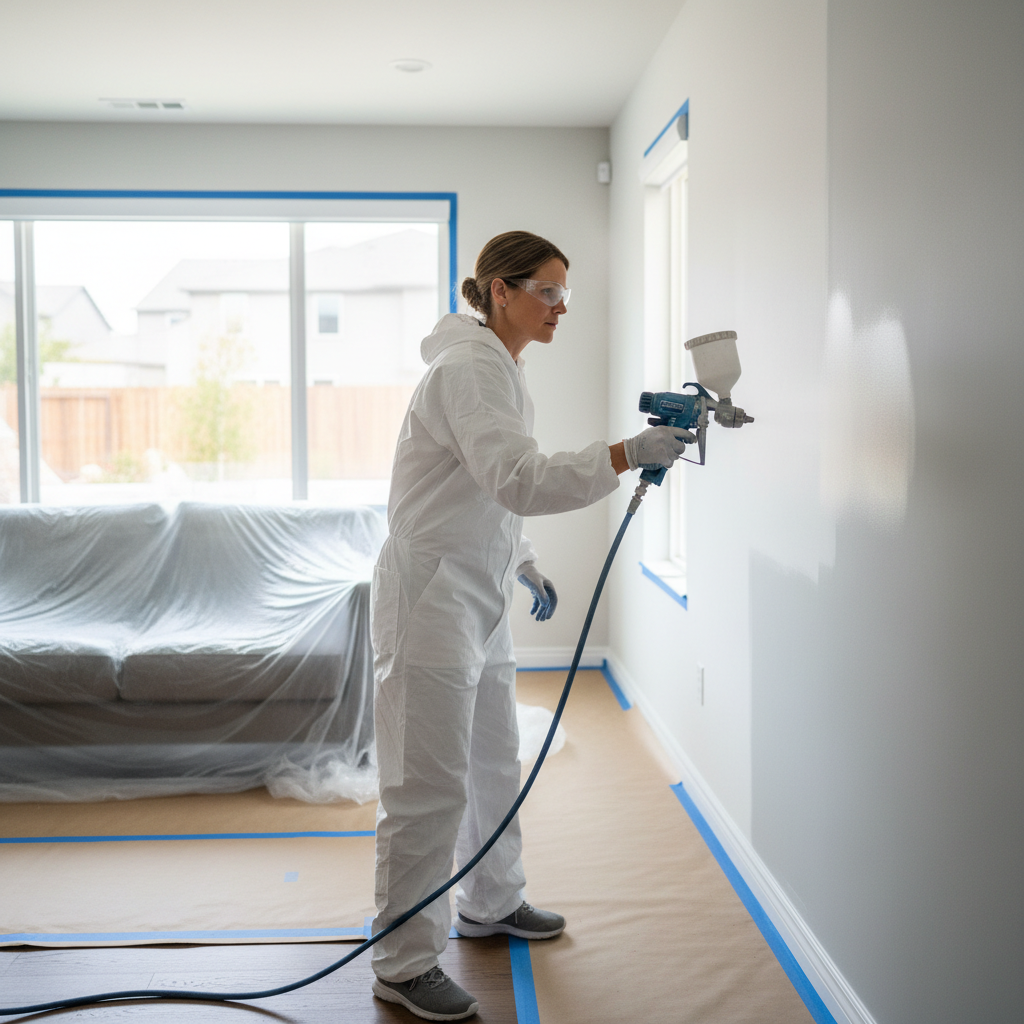
Practical Setup: Masking, Ventilation, and Safety Indoors
Indoor spraying is mostly prep work. Once you accept that, results get dramatically better.
Containment: Use plastic sheeting to isolate the work zone, and seal doorways with painter’s tape. Cover floors wall-to-wall when spraying ceilings or walls because mist travels farther than it looks.
Ventilation: Create airflow out a window when possible, and keep the air moving away from the rest of the house. According to EPA, improving ventilation helps reduce exposure to indoor air pollutants during activities like painting.
PPE: Many paints and primers can irritate lungs or eyes. A respirator, eye protection, gloves, and long sleeves are common-sense choices. If you have asthma or other respiratory conditions, it’s smart to be extra cautious and consider asking a medical professional what’s appropriate for you.
Fire and ignition sources: Some coatings and solvents can be flammable. Follow the coating label, keep the area free from open flames, and don’t assume “low odor” equals “no risk.”
Step-by-Step: Getting a Smooth Interior Finish Without Runs
This workflow fits most interior DIY jobs, whether you choose HVLP or airless.
- 1) Pick the right coating for spraying: Many wall paints spray fine with the correct tip, while cabinet enamels often need careful technique. Check label guidance and avoid guessing on thinning.
- 2) Strain the paint: A simple mesh strainer can prevent surprise clogs and spatter.
- 3) Test spray pattern: Spray cardboard, adjust fan width and flow, then confirm you’re not getting tails or heavy edges.
- 4) Keep consistent distance: Around 8–12 inches is common, but follow your sprayer guidance. Too close causes runs, too far causes dry spray.
- 5) Move before you pull the trigger: Start motion, then spray, then release before you stop. It feels awkward for five minutes, then it clicks.
- 6) Overlap passes: Many painters aim around 50% overlap for even coverage.
- 7) Do lighter coats on cabinets: Two to three lighter coats often beat one heavy coat, especially on vertical faces.
Key point: If you’re chasing the best paint sprayer for home interior cabinets, your finish usually improves more from better prep and lighter coats than from buying a bigger unit.
Common Mistakes (and What to Do Instead)
- Cranking pressure to fix coverage: If coverage feels weak, check tip size and paint viscosity before increasing pressure.
- Skipping masking because “it’s just one wall”: Overspray tends to find the one thing you forgot to cover.
- Not back-rolling walls when needed: Some wall paints and textures look more uniform with a light back-roll after spraying. Try a small section first.
- Ignoring dry time and recoat windows: Rushing can trap solvents or cause adhesion issues, especially on cabinets and trim.
- Cleaning halfway: Partial cleaning leads to clogs next session, and then the sprayer gets blamed.
When to Rent, Buy, or Call a Pro
Buying makes sense if you expect repeated projects: cabinets now, bedrooms later, maybe a fence or garage after that. Renting can be smarter for a one-time whole-room job, especially with airless units.
Calling a pro becomes reasonable when you need consistent cabinet-grade results, have high ceilings or stairwells, or your home can’t be easily contained. According to OSHA, respiratory protection and proper controls matter when workers are exposed to airborne contaminants; that same mindset is worth adopting at home, even if the exact requirements differ.
If lead paint might be present in an older home, take extra care. According to EPA, lead-safe practices are recommended for renovation activities that disturb lead-based paint; when in doubt, ask a certified professional for guidance.
Conclusion: Picking the Right Interior Sprayer for 2026
The “best” choice usually breaks down simply: HVLP for cabinets, doors, and detail, airless for walls and ceilings, and whichever option you choose, put real effort into masking and airflow.
If you want a clean next step, write down your primary project and square footage, then match it to the sprayer type and features above, and plan your prep time before you plan your paint time. That one habit saves money, mess, and frustration.