
how to sharpen garden tools at home comes down to two things: keeping the original bevel (the factory angle) and removing just enough metal to bring back a clean edge.
If your pruners crush stems, your shovel feels like it bounces off soil, or your hoe keeps skating over weeds, the tool usually isn’t “old,” it’s just dull. A sharper edge means less effort, cleaner cuts, and typically less damage to plants because you stop tearing and start slicing.
One quick myth to drop now: you don’t need a bench grinder for most yard tools. In many cases, a file, a stone, and 10–20 minutes per tool is plenty. This guide walks you through choosing the right sharpener, checking whether sharpening is even the right fix, and getting reliable results without overthinking it.
Why garden tools go dull (and when sharpening won’t help)
Dullness usually comes from normal abrasion: soil contains sand and small minerals that act like sandpaper, and cutting into woody stems slowly rounds over the edge. Rust also “fattens” an edge, making it feel blunt even when the metal underneath is fine.
But sometimes sharpening isn’t the main problem. Look for these common situations:
- Loose pivots on pruners/loppers: the blades separate under load, so they crush instead of cut.
- Chipped or deeply nicked edges: a file can fix small nicks, but big chips may take a long time by hand.
- Severe rust pitting at the edge: you may sharpen past it, but the edge can stay fragile.
- Bent blades (shovels, hoes): sharpening a bent edge still feels wrong in use.
According to OSHA, hand and power tool injuries often come from improper maintenance and unsafe handling, so treat sharpening as a small “shop task” with real safety steps, not a quick shortcut.
A quick self-check: do you need sharpening, cleaning, or adjustment?
Before you remove metal, do a 60-second check. This saves time and keeps you from filing away a tool that only needed cleaning.
Fast checklist
- Cut test (pruners): does it slice paper or a thin twig cleanly, or does it crush and slip?
- Visual edge check: hold the edge under a bright light, a dull edge reflects light as a shiny line.
- Rust and sap: sticky buildup on pruning blades can mimic dullness.
- Wobble: open and close pruners, if the blades shift side-to-side, tighten the pivot first.
- Edge shape: if the bevel looks uneven or “rolled,” plan to re-establish it with a file.
If you’re unsure, start with cleaning and pivot adjustment. If performance still feels off, sharpening becomes the next logical move.
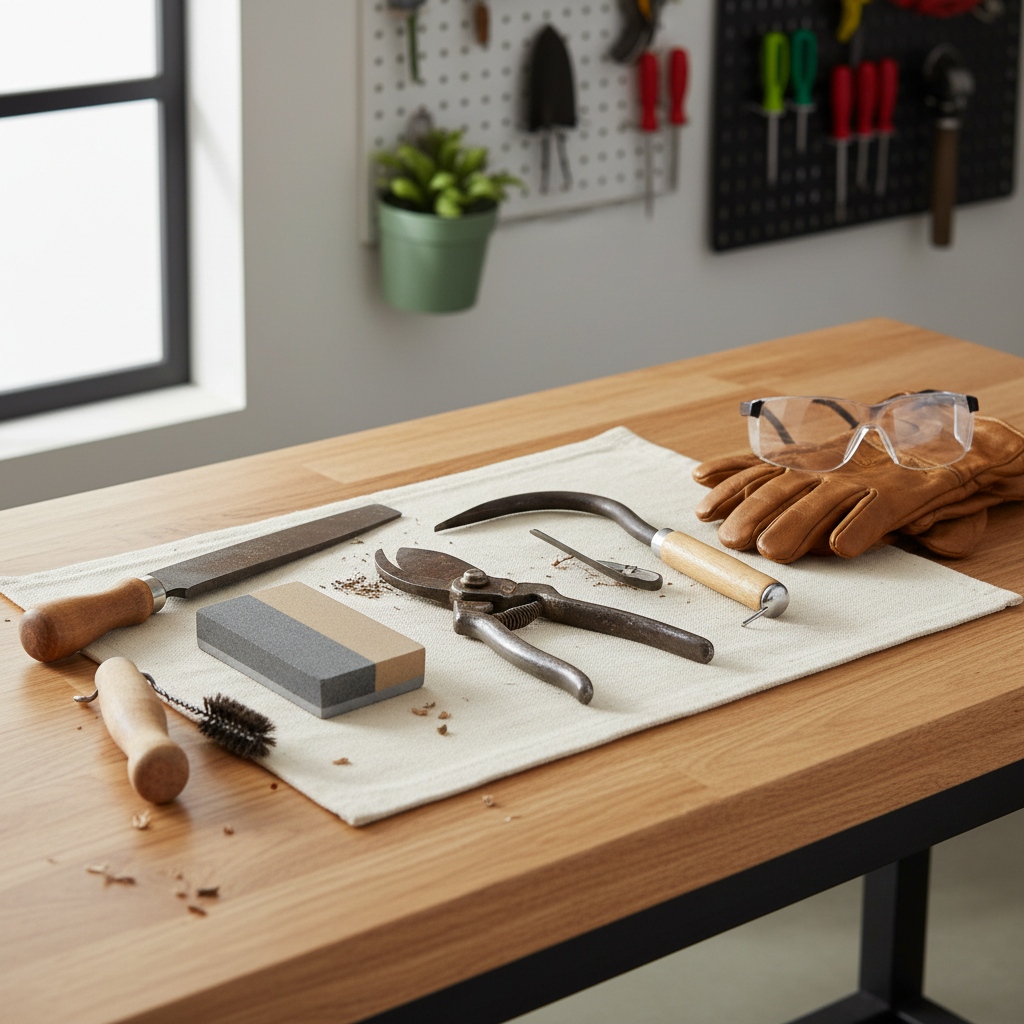
Tools and supplies (what matters, what doesn’t)
For how to sharpen garden tools at home, the best kit is simple. You want something that removes metal predictably and helps you keep a consistent angle.
| Tool | Best for | Why you’d pick it |
|---|---|---|
| Mill file (8–10 in.) | Shovels, hoes, axes, mower blades (off the mower) | Fast metal removal, easy angle control |
| Diamond file or sharpening stone | Pruners, loppers, hedge shears | More control on small beveled edges |
| Wire brush + rag | Any tool | Removes rust and debris so you can see the edge |
| Clamp or vise | Most tools | Stability and safer hand position |
| Light oil | Pruners, shears, hinges | Protects from rust and improves action |
Key point: avoid ultra-aggressive grinding unless you already know you need it. Power grinders can overheat edges (you’ll see discoloration), which can weaken temper on some steels.
Sharpening basics: angles, burrs, and the “don’t overdo it” rule
You don’t need to measure angles with a gauge, but you do need to respect the bevel that’s already there. Most garden tools have a single bevel, meaning you sharpen one side and leave the back relatively flat.
- Match the existing bevel: keep your file or stone flush to the sloped face, if you change it drastically, the tool may feel grabby or fragile.
- Work from heel to tip: consistent strokes produce a straighter edge than “spot sharpening.”
- Chase a burr, then remove it: a burr is a tiny wire edge that forms on the opposite side, it signals you reached the edge. Finish by knocking it off with a light pass on the flat side or with a fine stone.
- Stop when it’s sharp enough: yard tools rarely need razor edges. For shovels and hoes, “clean and crisp” beats “shaving sharp.”
If you’re learning how to sharpen garden tools at home, consistency matters more than brute force. Light, repeatable strokes usually beat pressing hard.
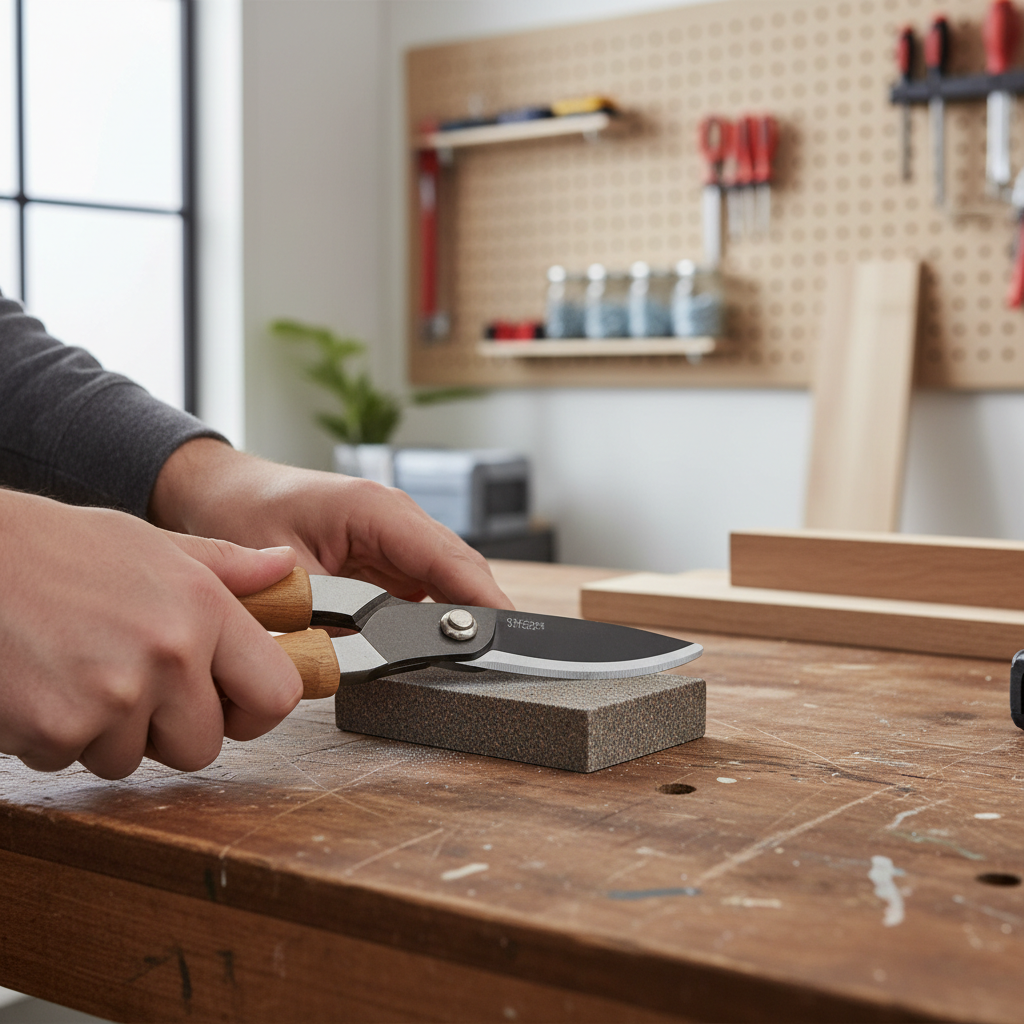
Step-by-step: how to sharpen pruning shears and loppers
Bypass pruners (the most common type) have one beveled cutting blade and one thicker hook-like blade. You sharpen the beveled cutting blade only.
1) Clean and inspect
- Scrub sap and grime with a rag and brush.
- If there’s sticky residue, a small amount of solvent can help, follow the product label.
- Tighten the pivot so blades meet cleanly without wobble.
2) Lock the tool steady
- Clamp the handle or hold it on a non-slip surface, keep fingers clear of the stroke path.
3) Sharpen the bevel
- Set the stone or diamond file against the bevel, typically around the existing factory angle.
- Stroke in one direction along the bevel, heel to tip, 10–30 passes depending on dullness.
- Watch for a small burr forming on the back side.
4) Deburr and test
- Make one or two very light passes on the flat back side to remove the burr, don’t create a second bevel.
- Test on a small twig, you want a clean slice with less hand force.
5) Oil and re-check alignment
- Add a drop of oil at the pivot and wipe excess.
- If the tool still crushes, the issue may be blade alignment or a worn anvil/bypass part, not sharpness.
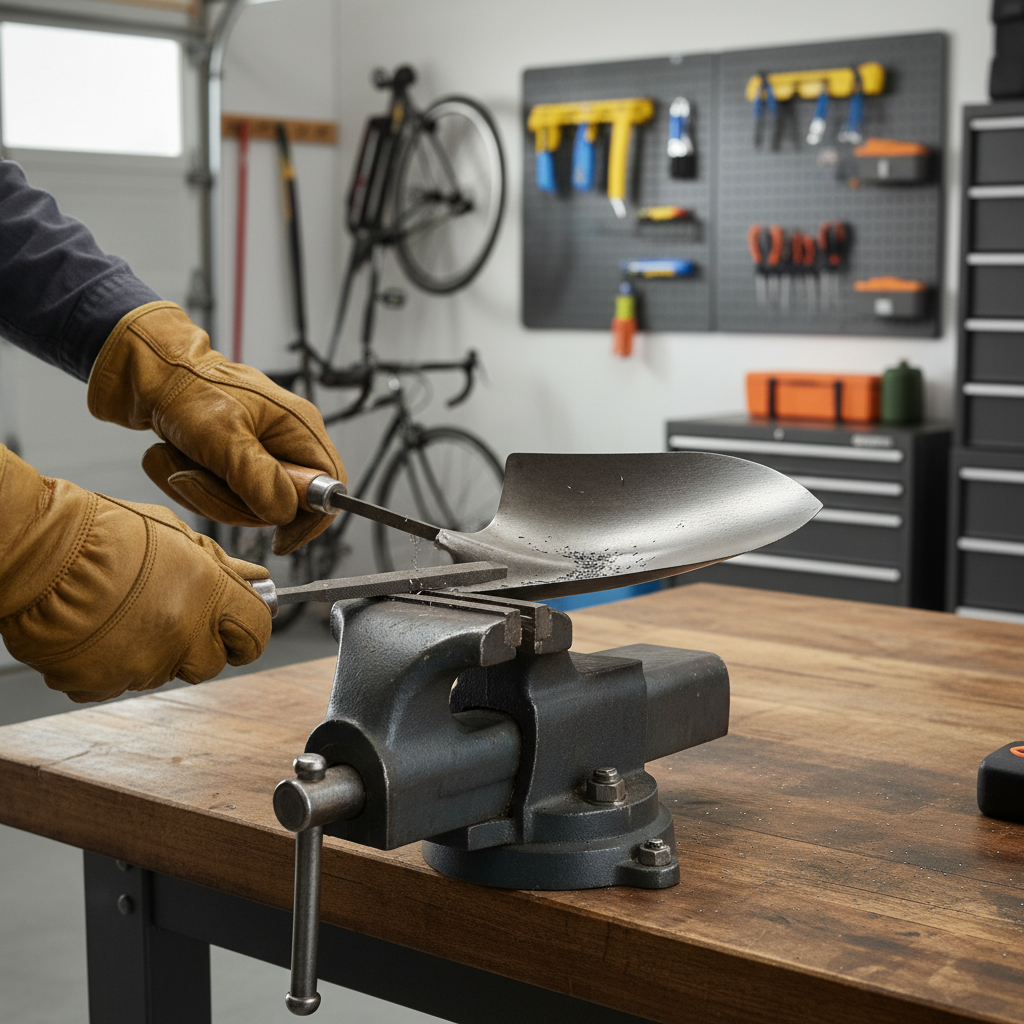
Step-by-step: how to sharpen shovels, hoes, and spades
Digging tools don’t need a knife edge. The goal is a defined bevel that bites into soil and roots without folding over.
1) Remove caked dirt and rust
- Wire-brush the edge and face, wipe clean so you can see the bevel line.
2) Secure the tool
- Clamp the blade to a bench or brace it so it won’t shift mid-stroke.
3) File the bevel
- Use a mill file, push away from your body along the bevel.
- Keep strokes even across the width, checking that you’re not creating waves.
- Stop once the bright, rounded line at the edge disappears and the edge looks crisp.
4) Light finishing pass
- Optional: a few light strokes with a finer stone can smooth the edge, helpful in rocky soil where jagged edges chip faster.
Practical note: if your shovel edge frequently hits rocks, leaving it slightly less aggressive often reduces nicks and saves you touch-up time.
Common mistakes that waste time (or damage tools)
Most sharpening frustration comes from a few predictable errors. Fix these and the whole process gets calmer.
- Changing the bevel angle: it feels like sharpening, but you’re really reshaping, which takes longer and can weaken the edge.
- Sharpening both sides of bypass pruners: this can create a wedge that forces the blades apart.
- Skipping cleaning: filing through sap or rust clogs the file and scratches the bevel.
- Over-sharpening digging tools: super-thin edges on shovels and hoes tend to roll quickly in hard soil.
- Ignoring safety gear: gloves help, but eye protection matters too, especially with wire brushing and filings.
According to the CDC, eye protection is an important control for tasks that can create flying debris, which can include tool maintenance work that produces filings or rust particles.
Maintenance rhythm: keeping edges sharp longer
Once you learn how to sharpen garden tools at home, the real win is needing fewer full sharpening sessions.
- Wipe after use: even a quick rag wipe slows rust.
- Light oil on metal surfaces: especially before storage or after working wet soil.
- Touch-up, not rescue: 5 minutes of light filing every few weeks in the season often beats one big overhaul.
- Store dry: humidity and damp sheds accelerate corrosion.
- Check fasteners: pruners that loosen up “feel dull” fast.
Key takeaways: match the bevel, stabilize the tool, chase a small burr, then stop. Sharp enough is the target, not perfect.
When to get professional help (or replace the tool)
Most homeowners can handle routine sharpening, but a few cases are worth outsourcing or at least getting advice from a local hardware shop or tool service.
- Large chips or cracks: removing that much metal by hand can take a long time, and cracks can worsen under load.
- Power equipment blades: mower blades and similar parts have balance concerns, a shop can sharpen and balance properly.
- Repeated poor cutting after sharpening: pruners may have alignment issues, worn parts, or a bent blade.
- Any uncertainty with grinders: if you’re tempted to “just grind it,” it may be safer to ask someone experienced.
If you suspect a tool is unsafe to use, pausing and consulting a professional is usually the smarter move than forcing one more season out of it.
Conclusion: a simple home routine that actually works
how to sharpen garden tools at home is less about fancy gear and more about steady technique: clean first, keep the factory bevel, sharpen until you raise a small burr, then deburr and protect the metal. Pick one tool this week, sharpen it, and pay attention to how it feels in use, that feedback teaches faster than any chart.
If you want a practical next step, set up a small “maintenance box” with a mill file, a diamond stone, a wire brush, and light oil, then do quick touch-ups before tools get truly dull.
FAQ
- How often should I sharpen garden tools at home?
It depends on use and soil. Many people do light touch-ups every few weeks during peak season and a fuller sharpening before storage. - What angle should I use when sharpening pruners?
Usually you’ll get the best result by matching the existing bevel rather than choosing a number. If you stay flush to the factory bevel, cutting performance is typically more predictable. - Can I use a kitchen knife sharpener on garden tools?
For most pruners and digging tools, it’s not a great fit. These sharpeners often force a fixed angle and can chew up thicker edges, a file or stone gives more control. - Do shovels need to be razor sharp?
No, and in rocky or compacted soil, razor sharp can fold over faster. A clean, crisp bevel usually digs better without becoming fragile. - Why are my pruners still crushing after sharpening?
Common causes include a loose pivot, misalignment, a nicked blade that needs more work, or buildup on the hook blade. Adjustment and cleaning often matter as much as sharpness. - Is it safe to sharpen tools without a vise?
It can be, but it’s easier to slip. If you can’t clamp the tool, stabilize it on a non-slip surface, keep hands out of the stroke path, and wear eye protection. - Should I remove rust before sharpening?
Yes, at least around the edge. Rust can hide the true bevel and clog your file, so a quick wire-brush pass usually saves time.
If you’re working through a whole shed of dull tools and want a more streamlined approach, a basic home sharpening kit and a repeatable checklist can save a lot of weekend time, especially if you’d rather do quick touch-ups than big repair sessions.